No Bake Cookies! Perfect for the Busy Mommy.

Leave a comment

I love, love, love, LOVE no bake cookies of almost any kind!

When I’m in a rush, they are my go-to dessert.

The best part? You can make them entirely allergy free.

For your kitchen tools, all you will need is a sauce pot, a spoon for stirring, parchment paper, plastic wrap and a cookie sheet.

20131024_191835

First, add 1 cup honey, 1/2 cup coconut oil and 8 Tb unsweetened cocoa to your sauce pot.

20131024_192100

On the stove, turn the heat to medium high and bring the mixture to a boil while stirring constantly. Continue to stir as it simmers and thickens for about three minutes.

20131024_192542

Next, remove the mixture from the heat and add 1 cup peanut or other nut butter, 1 tsp vanilla, 1 1/2 to 2 cups gluten free old fashioned oats (gf quick oats will work too) and 1 cup shredded unsweetened raw coconut. I ran out of coconut, so we’ll just have to make believe we have some here. Stir well until all ingredients are mixed thoroughly.

20131024_193121

On a parchment lined cookie sheet, drop mixture by spoon fulls. Go ahead and make them whatever size you want. No bake versions break all the rules.

20131024_193231

Cover with plastic wrap if you’re a complete, nerdy clean freak like me. If not, still cover the cookies. It’s gross if you don’t.

Place the entire sheet in the freezer for 15 minutes or the fridge for at least an hour.

The rest of the instructions are listed below.

Now, if you’ll excuse me, I have some no bake cookies and a cup of green tea calling my name!

No Bake Cookies. Free of most major allergens.

  • 1 cup honey
  • 1/2 cup coconut oil (or another unrefined oil, extra light is best)
  • 8 tablespoons cocoa powder
  • 1 cup peanut butter or other nut butter
  • 1 teaspoon vanilla
  • 1 cup shredded, unsweetened coconut (preferably raw)
  • 1 1/2 to 2 cups GF old fashioned oats (You’ll know you have too many oats if mixture becomes hard to stir. For this reason, add oats gradually to desired consistency.)

Bring honey, coconut oil, and cocoa to a boil. Turn down heat and simmer for three minutes or until thickened.

Remove from heat and stir in peanut butter, vanilla, coconut, and oatmeal. Drop by small to medium spoon fulls onto a parchment lined cookie sheet. Refrigerate until set. If you really want those cookies ‘NOW’, put them in the freezer for fifteen minutes. If you have any left (HIGHLY DOUBTFUL), Store in a ziploc bag or airtight container in the refrigerator or freezer.

Happy No Baking!!!!

Thursday Things

1 Comment

Basketball season….. can we have the kids’ end of season tournaments NOW please?

As fun as it is watching my big babies stuff, foul, box out and slam dunk, I am ready to get back to my routines.

Like baking and taking last minute cell phone pictures of the results to share with all two of you who read my posts.

But for now, I’ll just share a few neato mosquito products I’ve run across – literally run, as in running through the store on my way to the next game – at the market.

Van’s Snack Bars

vans snacks

These little guys are just….YUM! The cranberry variety tastes like gingerbread with generous servings of dried cranberries in each bite.

Click on the link above to view all flavors, ingredients and other nutrition information.

Van’s Crackers

vans crackers

They may be small, but, boy howdy! These are some GOOD crackers!

To view and read more about these delightful little bites, click on the link above.

Justin’s Dark Chocolate Peanut Butter Cups *

justins

If I ever want to feel like all is right with the world, I buy myself a package of these glorious dairy free, gluten free cups of happiness.

Seriously. They boost your endorphins or something like that.

Forget runner’s high. Eat peanut butter cups instead. WAY more euphoric, I guarantee.

*I have found that ONLY the DARK chocolate variety is dairy free. When you click on the link, it will take you to the milk chocolate ingredients. If you cannot partake of dairy, be sure to click on the little ‘dark chocolate’ guy to see his ingredients. That sounded weird. Sorry. Just….you know what I mean.

Bakery on Main Granola

bakery on main

I will admit, this stuff is a little more spendy than I would like it to be.

But, man! Is it GOOD!

I especially like the Cranberry Maple kind. Deeeeeelicious!

And, honestly, a 1/2 cup serving with your choice of milk will fill your stomach cavity and keep you going until lunch time. It’s that hearty!

Click on the link above to see other varieties and nutrition information.

So there you have it! Some helpful little hints to help you eat well and wise (Don’t diss my peanut butter cups. Peanut butter is full of protein….and dark chocolate has antioxidants!).

Happy Busy Days!

Hot Fudge Pudding Cake. It Makes Winter Bearable. But Your Jeans Unwearable.

1 Comment

Sorry about that title.

But it is the truth. Why not just tell it like it is?

But it’s so good, so decadent, you won’t be able to resist. So just hit the gym a little more often and you’ll still be able to fit into those Levi’s. Or Lawmans. Or Hash Jeans. Wait. I’m dating myself.

Shall we begin?

My oldest daughter requested this delightful treat the weekend after her heart stopping accident (see previous post). Not being able to find one that fit our allergy specifications, I found a recipe in my old Pillsbury cookbook and revamped it to be allergy free and also to contain less sugar.

Excuse me while I take a moment to get down with my bad self. *clap clap clap*

And this is what we came up with:

Allergy Free/Vegan/Low Sugar Hot Fudge Pudding Cake

  • 1 1/4 cups gluten free flour
  • 2/3 cup sugar (I used evaporated cane crystals. You can use coconut sugar, date sugar or even 1/2 cup agave.)
  • 2 Tb. unsweetened cocoa powder
  • 1 1/2 tsp baking powder
  • 1/2 tsp salt
  • 1/2 cup almond or other milk (I used unsweetened – highly recommended here)
  • 2 Tb melted Earth Balance spread
  • 1 tsp vanilla
  • 1/2 cup sugar (This recipe will work best if you use some form of crystallized sugar rather than agave for this step.)
  • 2 Tb unsweetened cocoa powder
  • Dash salt
  • 1 1/3 cups very hot water (120-130 degrees F)

Heat oven to 350 degrees.

In a medium bowl, combine flour, 2/3 cup sugar, 2 Tb cocoa, baking powder, and 1/2 tsp salt. Blend in almond milk, Earth Balance and vanilla. Mix well. 

Spread batter in an ungreased 8″ square baking dish. Your batter will not resemble traditional cake batter at all. It will be more like a dough.

In a small bowl, combine 1/2 cup sugar, 2 Tb cocoa and dash salt. Mix well to combine. Sprinkle evenly over cake batter. Pour hot water evenly over sugar mixture.

Bake at 350 for 35-40 minutes or until center is set and firm to the touch.

And for the love of Green Acres, serve it warm! With coffee! 

This is extra good with dairy free whipped cream (such as Rich’s or refrigerated canned coconut milk) or vanilla ice cream (such as Coconut Bliss).

Be aware that even though the sugar is reduced in the recipe, it is still quite sweet. So take a small serving to begin with. And then you can, of course, take another small serving after that. I think that’s reasonable.

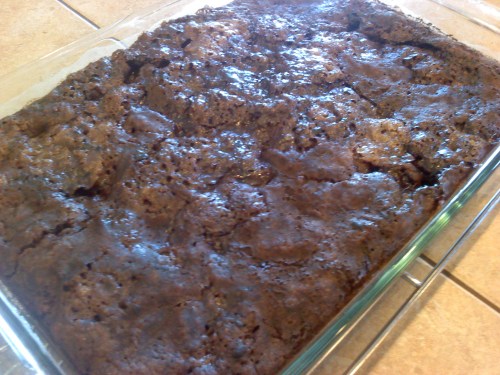
What your cake should look like when it is done. (Yes, I doubled mine. I have two seventeen year old man children).

What your cake should look like when it is done. (Yes, I doubled mine. I have two seventeen year old man children).

Happy Warm and Cozy Dessert Days!

Espresso Peppermint Mocha Crinkles

Leave a comment

pep choc crinkles

This, my friends, is what Christmas tastes like.

WARNING! Before you make these, you may want to purchase the Insanity or Jillian Michaels workout videos. Because you’re going to eat them all. You won’t be able to stop! They are so devastatingly delicious.

Espresso Peppermint Mocha Cookies
  • 2 cups GF flour 
  • 2 teaspoons baking powder
  • ½ teaspoon salt
  • 1 cup (yes, you read that right) baker’s cocoa powder (such as Hershey’s)
  • 2/3 cup white sugar 
  • ¼ cup brown sugar
  • ½ cup vegetable oil (I used extra light olive oil)
  • 1.5  Tablespoons espresso powder, ground super fine in a coffee grinder 
  • 4  eggs OR the equivelent in egg replacer
  • 1 teaspoon pure vanilla extract
  • 1/4 to 1/2  teaspoon peppermint extract (Amount is depending on how ‘pepperminty’ you like it – the smaller amount will give a hint of peppermint while the full amount will definitely make the peppermint take center stage. Do not double your extract if you double the recipe or it will be too overpowering.)
  • ¼ cup powdered sugar (for rolling the cookies)

Combine all of your wet ingredients and blend with a stand or hand mixer. Next, blend together your dry ingredients in a separate bowl and then add to wet ingredients. Blend until mixed well and ingredients form a dough.

If using GF flour, you may notice that the mixture is a bit dry. Mine was, so I gradually added small amounts of  unsweetened almond milk until I felt it was the right consistency of cookie dough. Not too dry or wet but tacky to the touch.

Optional: Cover the bowl with plastic wrap and allow the dough to chill in the refrigerator for at least 4 hours. I did not do this. I wanted to get at these cookies!
When you are ready to bake your cookies, preheat the oven to 350 degrees Fahrenheit. Line a baking sheet with parchment paper. (Do this step if you can. It’s a great kitchen tool!)
Roll the dough into 1 Tablespoon sized balls. Dip half of the dough ball into the powdered sugar, then place the ball onto the prepared cookie sheet, powdered sugar-side up. Place the dough balls at least 1 inch apart on the cookie sheet. When you have filled a cookie sheet, very lightly and gently press down on each ball, slightly flattening it.
Bake the cookies on the center rack of the oven for 8-9 minutes, until the cookies begin to crack on top, and the visible insides of the cookies appear gooey.  Do not over bake the cookies, as they will become dry and crumbly.  Let cookies cool on sheet for a few minutes before transferring to wire rack. 
And proceed to eat the entire batch. Not really. Yes, really. Really.
Happy Delicious Days!

Toll House Cookies – Allergy Free Style

2 Comments

Just because you have allergies to certain foods does not necessarily mean you can never again eat your favorite recipes.

The following recipe is from the original, with changes added by me.

Our family doesn’t even notice the difference.

So yummy and gooey and chocolately and …. well, let’s just get started, shall we?

I apologize that there are no pictures. But I think y’all know how to make cookies. I’ll take some and insert them the next time we prepare them.

Allergy Free Toll House Cookies

2 1/4 cups all purpose gluten free flour mix (see recipe link at top of blog)

*If you live in a very dry climate, you may need to reduce the flour to 2 cups*

1 tsp baking soda

1 tsp salt

3/4 cup Earth Balance spread *OR*1 cup softened butter

1/2 cup brown sugar

1/2 cup granulated sugar

*OR* substitute the above sugars with 3/4 cup agave

1 tsp vanilla extract (gf)

Egg replacer equivalent of 2 eggs *OR* 2 eggs *OR* 6 Tb plain applesauce

1 cup Enjoy Life miniature chocolate chips or your choice of chips

Preheat oven to 375.

In a large bowl, cream together Earth Balance and sweeteners. Add your egg replacer and vanilla and blend well. Next, add the flour, soda and salt. Blend well. Stir in the chocolate chips. Scoop with a small cookie scoop onto an ungreased cookie sheet or baking stone.

Bake for 9-12 minutes, or until edges are golden. Remove from oven and let cool for five minutes before transferring to a cooling rack. It is best to let these cookies cool for a bit before eating as they can be crumbly when warm. When they cool, they are delightful.

Here are the links to the spread, egg replacer and chocolate chips:

Earth Balance

Ener-G Egg Replacer

Enjoy Life Chocolate Chips

Happy Getting Your Chocolate Fix!