No Bake Cookies! Perfect for the Busy Mommy.

Leave a comment

I love, love, love, LOVE no bake cookies of almost any kind!

When I’m in a rush, they are my go-to dessert.

The best part? You can make them entirely allergy free.

For your kitchen tools, all you will need is a sauce pot, a spoon for stirring, parchment paper, plastic wrap and a cookie sheet.

20131024_191835

First, add 1 cup honey, 1/2 cup coconut oil and 8 Tb unsweetened cocoa to your sauce pot.

20131024_192100

On the stove, turn the heat to medium high and bring the mixture to a boil while stirring constantly. Continue to stir as it simmers and thickens for about three minutes.

20131024_192542

Next, remove the mixture from the heat and add 1 cup peanut or other nut butter, 1 tsp vanilla, 1 1/2 to 2 cups gluten free old fashioned oats (gf quick oats will work too) and 1 cup shredded unsweetened raw coconut. I ran out of coconut, so we’ll just have to make believe we have some here. Stir well until all ingredients are mixed thoroughly.

20131024_193121

On a parchment lined cookie sheet, drop mixture by spoon fulls. Go ahead and make them whatever size you want. No bake versions break all the rules.

20131024_193231

Cover with plastic wrap if you’re a complete, nerdy clean freak like me. If not, still cover the cookies. It’s gross if you don’t.

Place the entire sheet in the freezer for 15 minutes or the fridge for at least an hour.

The rest of the instructions are listed below.

Now, if you’ll excuse me, I have some no bake cookies and a cup of green tea calling my name!

No Bake Cookies. Free of most major allergens.

  • 1 cup honey
  • 1/2 cup coconut oil (or another unrefined oil, extra light is best)
  • 8 tablespoons cocoa powder
  • 1 cup peanut butter or other nut butter
  • 1 teaspoon vanilla
  • 1 cup shredded, unsweetened coconut (preferably raw)
  • 1 1/2 to 2 cups GF old fashioned oats (You’ll know you have too many oats if mixture becomes hard to stir. For this reason, add oats gradually to desired consistency.)

Bring honey, coconut oil, and cocoa to a boil. Turn down heat and simmer for three minutes or until thickened.

Remove from heat and stir in peanut butter, vanilla, coconut, and oatmeal. Drop by small to medium spoon fulls onto a parchment lined cookie sheet. Refrigerate until set. If you really want those cookies ‘NOW’, put them in the freezer for fifteen minutes. If you have any left (HIGHLY DOUBTFUL), Store in a ziploc bag or airtight container in the refrigerator or freezer.

Happy No Baking!!!!

Strawberry Milk – Healthy Style

3 Comments

I don’t know about you (well, I probably don’t even KNOW most of you!), but I am trying to avoid sugar at all costs.

I was entirely sweetener free for a year (including honey, agave, stevia, you name it) and it’s amazing what we DON’T need sugar for! For that year, everything was sweetened entirely with fruit, and I learned to like it. A lot!

Since that time, whenever I bake, the sugar is always reduced, and even then, some things are too sweet.

However, over the cold, bitter winter, I let myself slip and began consuming sugar again little by little.

And I don’t like how it makes me feel.

Neither does my family.

But that’s a little personal, so we’ll just keep moving on.

Getting used to ‘no sweeteners’ takes time; but with perseverance, it becomes the preferred way to go.

That being said, I love fruity smoothies, sweetened with only fruit. And I love strawberry milk, sweetened only with ripe, red strawberries!

This is how I do it:

In a blender, place 6 ripe strawberries, MOSTLY hulled (the leaves are actually good for you). Then take a picture.

In a blender, place 6 very ripe CHILLED strawberries, MOSTLY hulled (the leaves are actually good for you). Then take a picture. No, I’m just kidding. You don’t really have to take a picture.

Next, add your choice of milk. (I used Original Unsweetened Silk Almond.)

Next, add your choice of  COLD milk. (I used Original Unsweetened Silk Almond.)

2 Cups is just the right amount for one serving.

2 Cups is just the right amount for one serving.

At this point, if you like a little more sweet, add a Tablespoon of honey or agave. But not too much: you don’t want to mask the strawberries.

Blend well on medium high speed or a smoothie setting.

Blend well on medium high speed or on the ‘smoothie’ setting.

Pour into your glass and enjoy!

Pour into your glass and enjoy!

You really don’t need sugar, honey or agave to make things taste good! We Westerners were just raised to *think* that we do.

Strawberry Milk

  • 6 very ripe, chilled strawberries – mostly hulled
  • 2 cups your choice milk
  • If desired, 1 Tb honey or agave

Place all ingredients into the blender. Blend well on medium high or on the blender’s ‘smoothie’ setting until combined.

Serve chilled.

Happy Being Sugar Free!

Chicken Marsala: Quick, easy and allergy free.

Leave a comment

I remember a time when I used to spend a day planning my menu, writing out my grocery list, clipping coupons and still having time to make a full gourmet meal complete with dessert and coffee. All before seven o’clock at night.

But back in those days, my kiddos were all small fries and I could corral them around me with library books, paper and crayons to make their own ‘grocery lists’ and ‘menus’.

Now that those little babies had the nerve to turn into busy, working, sports-playing, always on the go teens and young adults, that seemingly endless time to plan and prepare has all but evaporated.

But that’s okay, because it is my new normal. For the next few years anyway.

And for now, we have easy, favorite dishes, such as Chicken Marsala.

So to help you out, I’ll share it with you.

First, filet four boneless, skinless chicken breasts. In a large ziploc bag, combine 1 cup gluten free flour, 1/2 tsp salt and a dash of garlic powder. Add two chicken pieces at a time and shake to coat. Heat a few tablespoons of oil in a large skillet and crush in some garlic. Add the coated chicken pieces one at a time, turning once to fully brown and cook the meat.

First, filet four boneless, skinless chicken breasts. In a large ziploc bag, combine 1/2 cup gluten free flour, 1/2 tsp salt and a dash of garlic powder. Add two chicken pieces at a time and shake to coat. Heat a few tablespoons of oil in a large skillet and crush in some garlic. Add the coated chicken pieces one at a time, turning once to fully brown and cook the meat.

Keep the cooked chicken warm in an oven while you prepare the next step.

Keep the cooked chicken warm in an oven while you prepare the next step.


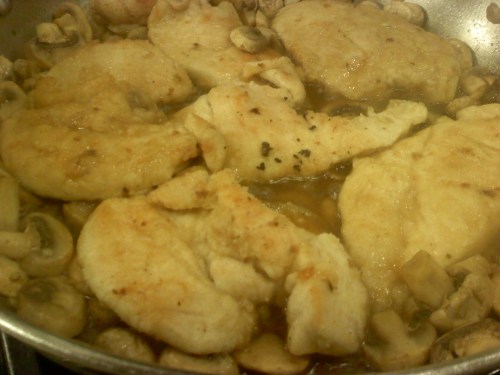
Once the chicken is done, put in in a warm oven on a plate. Next, add 1 cup Marsala cooking wine to the skillet along with a 16 oz pkg of sliced mushrooms. Add one or two more cloves of crushed garlic. Let the shrooms simmer in the cooking wine for about five minutes or until the liquid is reduced by half.

 Add 1 cup Marsala cooking wine to the skillet along with a 16 oz pkg of sliced mushrooms. Add one or two more cloves of crushed garlic. Let the shrooms simmer in the cooking wine for about eight minutes or until the liquid is reduced by half.

Add the cooked chicken back to the pan of liquid and mushrooms, turning once to coat with the juices. Let sit in the pan for about a minute on medium low heat to thicken the liquids.

Add the cooked chicken back to the pan of liquid and mushrooms, turning once to coat with the juices. Allow the chicken to sit in the pan for about a minute on medium low heat to thicken the liquids.

Serve with a side of seasoned rice. Delightful.

Serve with a side of seasoned rice. Delightful.


Allergy Free Chicken Marsala

First, filet four boneless, skinless chicken breasts.
In a large ziploc bag, combine 1/2 cup gluten free flour, 1/2 tsp salt and a dash of garlic powder.
Add two chicken pieces at a time and shake to coat.
Heat a few tablespoons of oil in a large skillet and crush in some garlic.
Add the coated chicken pieces one at a time, turning once to fully brown and cook the meat. Add more oil as you go, if necessary.
Keep the cooked chicken warm in an oven while you prepare the next step
Next, add 1 cup Marsala cooking wine to the skillet along with a 16 oz pkg of sliced mushrooms.
Add one or two more cloves of crushed garlic.
Let the shrooms simmer in the cooking wine for about eight minutes or until the liquid is reduced by half.
Add the cooked chicken back to the pan of liquid and mushrooms, turning once to coat with the juices. Let chicken sit in the pan for about a minute on medium low heat to thicken the liquids.
Serve with a side of seasoned rice.*

Seasoned Rice

  • 2 cups unconverted Jasmine rice
  • 3 cups chicken broth, such as Pacific
  • 1 tsp dill weed
  • 1 tsp garlic powder
  • 1 tsp crushed basil

In a medium sauce pot, combine all dry ingredients and then add the broth. Cover.

Cook over medium high heat until boiling.

Turn the heat down to low and allow to simmer, covered, until all liquid is absorbed.


Happy Easy Yet Delicious Dinners!

Last Minute Christmas Dinner Preparations

2 Comments

1775878959

It can happen just like *that*!

“I need one more dish! Aunt Gertie asked me to bring one more covered dish! Aaaaauuuggghhh!!!”

*wrings hands furiously*

Never fear. Here are a few ideas:

Green Bean Casserole: No gluten, dairy, egg or yeast (recipe created by my daughter, Courtney)

  • 1 box Imagine Foods Creamy Portobello Mushroom (the ingredients on the internet sometimes say this is made with soy milk. However, the boxes I purchase at my local grocer never have any soy. So if you are allergic to soy, go check it out at the store. I think Imagine may be a little behind the times on their ingredients update)
  • 1/4 cup corn or tapioca starch plus enough water to thin starch
  • 1 – 16 oz bag of frozen, french cut green beans, thawed
  • 1/4 cup shredded Daiya mozerella
  • 4 green onions, chopped finely
  • 2 Tbs sunflower (or your favorite) oil
  • Dash salt
  • 1 clove garlic, minced

Grease a medium casserole dish. Set aside. 

Preheat oven to 350 degrees.

In a bowl, blend with whisk the soup and starch until smooth. Add Daiya and green beans.

Transfer soup and green bean mixture to casserole dish. Place in oven and bake at 350 for 15 minutes.

Meanwhile, in a small skillet, heat oil. Add garlic, salt and chopped onion. Saute until onion begins to caramelize. 

Top casserole with green onions after the 15 minutes are up. Then bake for an additional 10 minutes or until casserole is bubbly.

veganaise

  • And if you simply want to bring a dip along with some veggies, never fear!

Simply click on this link to see my recipe for a quick, easy ranch dressing and dip.

cracker_category_0

DF-Wedge-Jack-US-NoBG_0

PACKAGE DELI MEAT 378X204 copy

  • And if you are dying for a cheese and cracker tray, EASY!

Get on down to the natural grocer and buy a package of allergy free lunch meat, such as Hormel Naturals, this Daiya cheese and a box of allergy free crackers, such as Mary’s Gone Crackers. Arrange on a cute little plate and hoard it all to yourself at the family gathering. Unless there are other food challenged people there. Then share, and you’ll be the star of the night.

Happy Christmas Eve!

Pasta Fagioli! Yes, you can eat that too!

Leave a comment

soup

Forget everything you’ve ever heard about Pasta Fagioli (pronounced ‘fa-shool’. or ‘fah-jool’. Take your pick).

You’ve probably heard that you’ll never, ever, ever eat it again because it’s full of gluten, dairy and all things off limits.

Psh.

I am here to turn that frown upside down.

But without pictures. I’m so sorry.  Basketball season for three of my teens has begun and I hab a code *sniff*. No time for pictures. But I’m still gonna share my recipe. With links! Fair? Fair.

Let’s get started.

Pasta Fajioli – No Gluten, No Dairy, No Eggs, No Soy, No Yeast

  • 2 cans (15 oz each) small white beans, drained
  • 1 (29 oz) can tomato puree
  • 1 (14 oz) can crushed tomatoes (The orgininal recipe that I tweaked for allergies calls for stewed tomatoes, of which we are not fans. If you like stewed tomatoes, by all means, go ahead.)
  • 1 Tbs EACH crushed basil, oregano, rosemary
  • 1 tsp salt (or more to taste, if desired)
  • 1/4 tsp pepper
  • 4 green onions, chopped finely
  • 2 celery stalks, thinly sliced and chopped
  • 2 carrots, peeled, sliced thinly and diced
  • 3 Cups broth (beef or chicken) OR water
  • 2 Cups uncooked small pasta (spirals, macaroni or broken spaghetti works well) **
  • 1 lb cooked and seasoned ground beef, drained
  • Optional: shredded Daiya cheese for topping

In a 4 or 5 quart saucepot, combine all ingredients except pasta and Daiya. Bring ingredients to a boil over medium high heat. Reduce heat to low. Cover and allow to simmer for 20 minutes. Add pasta and simmer, uncovered, and stirring occasionally, for an additional ten minutes or until pasta is al dente.

Ladle into bowls and garnish with Daiya, if desired.  Makes six servings.

**Should you choose to use brown rice pasta in this recipe, it would be a splendid idea for you to pre-cook your pasta then add it to the soup when it is ready to be served. If you choose to add it directly to the soup, remember, rice pasta makes the cooking water quite starchy and all that starch will be in your soup. Kinda icky. That is why I recommend the quinoa pasta for this dish.

Happy Cold Weather Comfort Foods!

Peanut Butter Cookies – Without the Worries

3 Comments

Unless you’re allergic to peanuts, that is.

Then you’ll need to worry.

Or just substitute a different kind of nut butter.

No worries. You can eat these.

Peanut Butter Oatmeal (or quinoa) Cookies: No egg, dairy, gluten, sugar or soy

  • 1/2 cup butter (1 stick), softened *OR* 1/3 cup Earth Balance Spread
  • 1/3 cup agave nectar or 1/2 cup honey (I recommend the honey)
  • 1 egg or 3 TB applesauce (I don’t recommend commercial egg replacers for this recipe. It makes the cookies too dry.)
  • 1 teaspoon vanilla extract
  • 1 cup peanut butter (I used and recommend Adams)
  • 1 1/4 cup GF flour
  • 1/2 cup old fashioned oats or 1/3 cup quinoa flakes
  • 1 teaspoon baking soda
  • 1/2 teaspoon salt

First, beat together all of your ‘wet’ ingredients: honey, Earth Balance, ‘egg’, vanilla and peanut butter. Next, add the flour, soda and salt. Then beat in the oats or quinoa. If your dough seems a little dry, add a few drops of almond or other milk to get it to ‘just moist’. You don’t want the dough to be wet.

(You’ll notice in the photos that there seem to be A LOT of oats! That’s because the original recipe – before I got to it and changed it all up – called for an insane amount of oats. I won’t do that to you, my friend.)

 Scoop by tablespoonfuls onto an ungreased stone or baking sheet. Criss cross the dough balls with a fork.

Bake at 350 degrees for 10 to 12 minutes or until edges are barely golden. Remove from oven and let cool for at least five minutes before transferring cookies to a wire rack. Allow to cool almost entirely or entirely before eating, as gluten free cookies tend to be crumbly when hot.

Make yourself a cup of coffee and take five with these yummy cookies.

Oh, and if you’re a sugar aholic, you probably will notice these aren’t as sweet as you would expect. Which is good, because you actually taste the ingredients and not the sweeteners. Even better!

Happy Cookie Breaks!