No Bake Cookies! Perfect for the Busy Mommy.

Leave a comment

I love, love, love, LOVE no bake cookies of almost any kind!

When I’m in a rush, they are my go-to dessert.

The best part? You can make them entirely allergy free.

For your kitchen tools, all you will need is a sauce pot, a spoon for stirring, parchment paper, plastic wrap and a cookie sheet.

20131024_191835

First, add 1 cup honey, 1/2 cup coconut oil and 8 Tb unsweetened cocoa to your sauce pot.

20131024_192100

On the stove, turn the heat to medium high and bring the mixture to a boil while stirring constantly. Continue to stir as it simmers and thickens for about three minutes.

20131024_192542

Next, remove the mixture from the heat and add 1 cup peanut or other nut butter, 1 tsp vanilla, 1 1/2 to 2 cups gluten free old fashioned oats (gf quick oats will work too) and 1 cup shredded unsweetened raw coconut. I ran out of coconut, so we’ll just have to make believe we have some here. Stir well until all ingredients are mixed thoroughly.

20131024_193121

On a parchment lined cookie sheet, drop mixture by spoon fulls. Go ahead and make them whatever size you want. No bake versions break all the rules.

20131024_193231

Cover with plastic wrap if you’re a complete, nerdy clean freak like me. If not, still cover the cookies. It’s gross if you don’t.

Place the entire sheet in the freezer for 15 minutes or the fridge for at least an hour.

The rest of the instructions are listed below.

Now, if you’ll excuse me, I have some no bake cookies and a cup of green tea calling my name!

No Bake Cookies. Free of most major allergens.

  • 1 cup honey
  • 1/2 cup coconut oil (or another unrefined oil, extra light is best)
  • 8 tablespoons cocoa powder
  • 1 cup peanut butter or other nut butter
  • 1 teaspoon vanilla
  • 1 cup shredded, unsweetened coconut (preferably raw)
  • 1 1/2 to 2 cups GF old fashioned oats (You’ll know you have too many oats if mixture becomes hard to stir. For this reason, add oats gradually to desired consistency.)

Bring honey, coconut oil, and cocoa to a boil. Turn down heat and simmer for three minutes or until thickened.

Remove from heat and stir in peanut butter, vanilla, coconut, and oatmeal. Drop by small to medium spoon fulls onto a parchment lined cookie sheet. Refrigerate until set. If you really want those cookies ‘NOW’, put them in the freezer for fifteen minutes. If you have any left (HIGHLY DOUBTFUL), Store in a ziploc bag or airtight container in the refrigerator or freezer.

Happy No Baking!!!!

Have a Blog, Never Post. Fail.

Leave a comment

My apologies. I have been on a hiatus not of my own choosing.

Life just gets busy that way, doesn’t it?

Well, I will be returning shortly with all kinds of yummy recipes, such as Cheesy Chicken and Ham Rolls made with Daiya and an amazing Peanut Butter Chocolate Chip Cookie recipe.

But for now, I’ll just leave you with a shout out for Glutenfreeda Foods Instant Oatmeal!


glutenfreeda

These tasty, filling oatmeal packets only contain about five ingredients.

So unlike most pre-packaged oatmeal, not only is Glutenfreea gluten and dairy free, it is healthy!

And they taste delicious!


Happy Quick and Yummy Breakfasts!


Good Bacteria in a Cup

Leave a comment

Forgive me, my two faithful readers, for my long absence.

I’ve been busy with strep throat, basketball games for the kiddos (four thousand and fifty four games, I’m sure of it), and a fun weekend away helping at our church’s College and Career camp.

Suffice it to say, I’ve been a leeeetle busy.

But not so busy that I didn’t discover a new yummy almond milk yogurt (hence the gross title to this post):

almond dream


I have tried other brands of almond milk yogurt, but so far, this one is my favorite.

Made by Almond Dream, it hosts a variety of good bacteria and also leaves out some ingredients that never agree with me, such as chicory root.

For breakfast, I love to combine the yogurt in a bowl with this:

Lifestyle Granola


Lifestyle Granolas are the perfect compliment to yogurt. While not all of the varieties are gluten free, several of them are. And they are sweetened with only honey (with the exception of some of the added ingredients, such as cranberries, which are sweetened with sugar), making it just right.

This yogurt/granola combination has become my new favorite breakfast.

Along with bacon and coffee, of course.

Fine. My second favorite breakfast.

But yogurt and granola are easier to prepare. And healthier.


Happy Getting Friendly Bacteria!

Allergy Free Peach Crisp? Bring It On.

1 Comment

Can’t have oats? No problem.

Can’t have flour? Again… no problem.

Can’t have almonds? Uhhhh….this could be a problem. But you could just switch out one ingredient. Problem solved.

Peaches which are crisped.

Peaches which are crisped.

Peach Crisp: No Gluten, Oats, Dairy, Eggs, Soy, Etcetera

  • 8 cups fresh peaches, sliced (I strongly recommend fresh, home frozen or home canned peaches.)
  • 1 Tb cornstarch or other thickener, such as tapioca starch
  • 2 Tb agave /or/ 3 Tb your choice of granulated sugar
  • 1 cup almond flour/meal
  • 1/2 tsp vanilla 
  • 2 Tablespoons brown sugar or 1 Tb. raw agave
  • 1/2 tsp sea salt
  • 1/2 (scant) tsp cinnamon
  • 4 Tablespoons Earth Balance

In a large bowl combine the peaches, cornstarch and 2 Tb agave.

Grease a 9×13 glass casserole dish.

Transfer peach mixture to dish.

Rinse out the bowl and once it is dried, combine the almond meal, vanilla, brown sugar, salt, cinnamon and Earth Balance. Mix well with a mixer to combine. Don’t be afraid to plunge your hands into the mixture to get it thoroughly blended if the mixer doesn’t do the trick. 

Spread topping evenly over peach mixture.

Bake at 350 degrees for 30 minutes or until topping is golden and the peach mixture is bubbling.

Cool for at least 15 minutes on a wire rack before serving.

And don't forget the Rich Whip! Or you could use chilled canned coconut milk.

And don’t forget the Rich Whip! Or you could use chilled canned coconut milk. Just refrigerate the can, drain off the liquid and whip the solid milk.


See? Rich Whip is just like the real deal! Healthy? No! Delicious? YES!

See? Rich Whip is just like the real deal! Healthy? No! Delicious? YES!

Serve your peach crisp warm with a dollop of your favorite whipped cream replacer. Or just eat it all by itself. It's that good!

Serve your peach crisp warm with a dollop of your favorite whipped cream replacer. Or just eat the crisp all by itself. It’s that good!

Happy Warm and Yummy Deliciousness!

Thursday Things

1 Comment

Basketball season….. can we have the kids’ end of season tournaments NOW please?

As fun as it is watching my big babies stuff, foul, box out and slam dunk, I am ready to get back to my routines.

Like baking and taking last minute cell phone pictures of the results to share with all two of you who read my posts.

But for now, I’ll just share a few neato mosquito products I’ve run across – literally run, as in running through the store on my way to the next game – at the market.

Van’s Snack Bars

vans snacks

These little guys are just….YUM! The cranberry variety tastes like gingerbread with generous servings of dried cranberries in each bite.

Click on the link above to view all flavors, ingredients and other nutrition information.

Van’s Crackers

vans crackers

They may be small, but, boy howdy! These are some GOOD crackers!

To view and read more about these delightful little bites, click on the link above.

Justin’s Dark Chocolate Peanut Butter Cups *

justins

If I ever want to feel like all is right with the world, I buy myself a package of these glorious dairy free, gluten free cups of happiness.

Seriously. They boost your endorphins or something like that.

Forget runner’s high. Eat peanut butter cups instead. WAY more euphoric, I guarantee.

*I have found that ONLY the DARK chocolate variety is dairy free. When you click on the link, it will take you to the milk chocolate ingredients. If you cannot partake of dairy, be sure to click on the little ‘dark chocolate’ guy to see his ingredients. That sounded weird. Sorry. Just….you know what I mean.

Bakery on Main Granola

bakery on main

I will admit, this stuff is a little more spendy than I would like it to be.

But, man! Is it GOOD!

I especially like the Cranberry Maple kind. Deeeeeelicious!

And, honestly, a 1/2 cup serving with your choice of milk will fill your stomach cavity and keep you going until lunch time. It’s that hearty!

Click on the link above to see other varieties and nutrition information.

So there you have it! Some helpful little hints to help you eat well and wise (Don’t diss my peanut butter cups. Peanut butter is full of protein….and dark chocolate has antioxidants!).

Happy Busy Days!

Chicken Marsala: Quick, easy and allergy free.

Leave a comment

I remember a time when I used to spend a day planning my menu, writing out my grocery list, clipping coupons and still having time to make a full gourmet meal complete with dessert and coffee. All before seven o’clock at night.

But back in those days, my kiddos were all small fries and I could corral them around me with library books, paper and crayons to make their own ‘grocery lists’ and ‘menus’.

Now that those little babies had the nerve to turn into busy, working, sports-playing, always on the go teens and young adults, that seemingly endless time to plan and prepare has all but evaporated.

But that’s okay, because it is my new normal. For the next few years anyway.

And for now, we have easy, favorite dishes, such as Chicken Marsala.

So to help you out, I’ll share it with you.

First, filet four boneless, skinless chicken breasts. In a large ziploc bag, combine 1 cup gluten free flour, 1/2 tsp salt and a dash of garlic powder. Add two chicken pieces at a time and shake to coat. Heat a few tablespoons of oil in a large skillet and crush in some garlic. Add the coated chicken pieces one at a time, turning once to fully brown and cook the meat.

First, filet four boneless, skinless chicken breasts. In a large ziploc bag, combine 1/2 cup gluten free flour, 1/2 tsp salt and a dash of garlic powder. Add two chicken pieces at a time and shake to coat. Heat a few tablespoons of oil in a large skillet and crush in some garlic. Add the coated chicken pieces one at a time, turning once to fully brown and cook the meat.

Keep the cooked chicken warm in an oven while you prepare the next step.

Keep the cooked chicken warm in an oven while you prepare the next step.


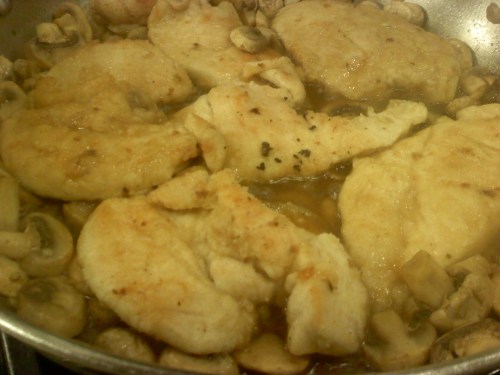
Once the chicken is done, put in in a warm oven on a plate. Next, add 1 cup Marsala cooking wine to the skillet along with a 16 oz pkg of sliced mushrooms. Add one or two more cloves of crushed garlic. Let the shrooms simmer in the cooking wine for about five minutes or until the liquid is reduced by half.

 Add 1 cup Marsala cooking wine to the skillet along with a 16 oz pkg of sliced mushrooms. Add one or two more cloves of crushed garlic. Let the shrooms simmer in the cooking wine for about eight minutes or until the liquid is reduced by half.

Add the cooked chicken back to the pan of liquid and mushrooms, turning once to coat with the juices. Let sit in the pan for about a minute on medium low heat to thicken the liquids.

Add the cooked chicken back to the pan of liquid and mushrooms, turning once to coat with the juices. Allow the chicken to sit in the pan for about a minute on medium low heat to thicken the liquids.

Serve with a side of seasoned rice. Delightful.

Serve with a side of seasoned rice. Delightful.


Allergy Free Chicken Marsala

First, filet four boneless, skinless chicken breasts.
In a large ziploc bag, combine 1/2 cup gluten free flour, 1/2 tsp salt and a dash of garlic powder.
Add two chicken pieces at a time and shake to coat.
Heat a few tablespoons of oil in a large skillet and crush in some garlic.
Add the coated chicken pieces one at a time, turning once to fully brown and cook the meat. Add more oil as you go, if necessary.
Keep the cooked chicken warm in an oven while you prepare the next step
Next, add 1 cup Marsala cooking wine to the skillet along with a 16 oz pkg of sliced mushrooms.
Add one or two more cloves of crushed garlic.
Let the shrooms simmer in the cooking wine for about eight minutes or until the liquid is reduced by half.
Add the cooked chicken back to the pan of liquid and mushrooms, turning once to coat with the juices. Let chicken sit in the pan for about a minute on medium low heat to thicken the liquids.
Serve with a side of seasoned rice.*

Seasoned Rice

  • 2 cups unconverted Jasmine rice
  • 3 cups chicken broth, such as Pacific
  • 1 tsp dill weed
  • 1 tsp garlic powder
  • 1 tsp crushed basil

In a medium sauce pot, combine all dry ingredients and then add the broth. Cover.

Cook over medium high heat until boiling.

Turn the heat down to low and allow to simmer, covered, until all liquid is absorbed.


Happy Easy Yet Delicious Dinners!

Hot Fudge Pudding Cake. It Makes Winter Bearable. But Your Jeans Unwearable.

1 Comment

Sorry about that title.

But it is the truth. Why not just tell it like it is?

But it’s so good, so decadent, you won’t be able to resist. So just hit the gym a little more often and you’ll still be able to fit into those Levi’s. Or Lawmans. Or Hash Jeans. Wait. I’m dating myself.

Shall we begin?

My oldest daughter requested this delightful treat the weekend after her heart stopping accident (see previous post). Not being able to find one that fit our allergy specifications, I found a recipe in my old Pillsbury cookbook and revamped it to be allergy free and also to contain less sugar.

Excuse me while I take a moment to get down with my bad self. *clap clap clap*

And this is what we came up with:

Allergy Free/Vegan/Low Sugar Hot Fudge Pudding Cake

  • 1 1/4 cups gluten free flour
  • 2/3 cup sugar (I used evaporated cane crystals. You can use coconut sugar, date sugar or even 1/2 cup agave.)
  • 2 Tb. unsweetened cocoa powder
  • 1 1/2 tsp baking powder
  • 1/2 tsp salt
  • 1/2 cup almond or other milk (I used unsweetened – highly recommended here)
  • 2 Tb melted Earth Balance spread
  • 1 tsp vanilla
  • 1/2 cup sugar (This recipe will work best if you use some form of crystallized sugar rather than agave for this step.)
  • 2 Tb unsweetened cocoa powder
  • Dash salt
  • 1 1/3 cups very hot water (120-130 degrees F)

Heat oven to 350 degrees.

In a medium bowl, combine flour, 2/3 cup sugar, 2 Tb cocoa, baking powder, and 1/2 tsp salt. Blend in almond milk, Earth Balance and vanilla. Mix well. 

Spread batter in an ungreased 8″ square baking dish. Your batter will not resemble traditional cake batter at all. It will be more like a dough.

In a small bowl, combine 1/2 cup sugar, 2 Tb cocoa and dash salt. Mix well to combine. Sprinkle evenly over cake batter. Pour hot water evenly over sugar mixture.

Bake at 350 for 35-40 minutes or until center is set and firm to the touch.

And for the love of Green Acres, serve it warm! With coffee! 

This is extra good with dairy free whipped cream (such as Rich’s or refrigerated canned coconut milk) or vanilla ice cream (such as Coconut Bliss).

Be aware that even though the sugar is reduced in the recipe, it is still quite sweet. So take a small serving to begin with. And then you can, of course, take another small serving after that. I think that’s reasonable.

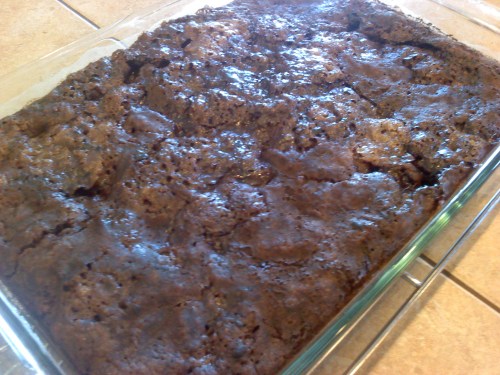
What your cake should look like when it is done. (Yes, I doubled mine. I have two seventeen year old man children).

What your cake should look like when it is done. (Yes, I doubled mine. I have two seventeen year old man children).

Happy Warm and Cozy Dessert Days!

Simply Snacks

Leave a comment

If you’re out and about and suddenly find your tummy grumbling, allow me to suggest a few yummy snacks to keep you going until the next meal time.

I call these 'Little Squares of Happiness'. Betty Lou's Fruit Bars are very similar to Newton style cookies. But healthier and allergy free.

I call these ‘Little Squares of Happiness’. Betty Lou’s Fruit Bars are very similar to Newton style cookies. But healthier and allergy free. And they are delightfully tasty.

Nana's allergy free cookies are excellent paired with an almond milk latte. They come in the big cookie size as well as packages of little cookie 'bites'. A variety of flavors make these a fun little snack to indulge in.

Nana’s allergy free cookies are excellent paired with an almond milk latte. They come in the big cookie size as well as packages of little cookie ‘bites’. A variety of flavors make these a fun little snack to indulge in.

If you want something a little healthier than a cookie but with the same sweet satisfaction, go for a Lara Bar! These little packages are super satisfying. They even come in a decadent 'Jocolat' collection, offering flavors such as mint chocolate and chocolate coffee. Don't forget to try their 'Uber' style bars as well, which are made from whole nuts and fruits.

If you want something a little healthier than a cookie but with the same sweet satisfaction, go for a Lara Bar! These little packages are super satisfying. They even come in a decadent ‘Jocolat’ collection, offering flavors such as mint chocolate and chocolate coffee. Don’t forget to try their ‘Uber’ style bars as well, which are made from whole nuts and fruits.

It goes without saying that anything from Enjoy Life is a sure to satisfy snack. They offer everything from snack bars to cookies to lip smacking chocolate bars , all free of the major allergens.

It goes without saying that anything from Enjoy Life is a sure to satisfy snack. They offer everything from snack bars to cookies to lip smacking chocolate bars, all free of the major allergens.

If something salty is what you're craving, Glutino brand offers a variety of crackers, pretzles and bagel chips. While primarily gluten free, I have found some of their products are free of dairy and eggs as well.

If something salty is what you’re craving, Glutino brand offers a variety of crackers, pretzles and bagel chips. While primarily gluten free, I have found some of their products are free of dairy and eggs as well.

I’ll just bet that some of you are now coming up with an excuse to be ‘out and about’ today, just so you can get your hands on one of these snacks!

Well, at least I am anyway! Now where are my keys…..?


Happy Snacking!

A Post for the Kiddos

Leave a comment

When I got married eighty billion years ago in 1991, Taste of Home and casseroles were all the rage.

In particular, Tater Tot Casserole.

It consisted of tater tots (bet ya didn’t see that coming!), a can of cream of mushroom soup, broccoli or green beans, cheese and ground beef.

I used to make it once a week when the children were little because:

  1. A 9×13 pan in those days fed our family for a few days.
  2. It was cheap.
  3. They loved it.

Of course, that dish is full of things the allergic soul should not consume.

But now…NOW….thanks to the frenzy of gluten free everything these days, I was able to reconstruct Tater Tot Casserole into an allergy free dish.

And my seventeen year old men children like it better than the original!

One disclaimer, though: You’ll see in the pictures that it looks like I went down to the local sewage plant and plopped the remnants there into my casserole dish. It is not a pretty meal. Not even a little bit. But it is delicious, and, in my freaky little world, that is all that matters.

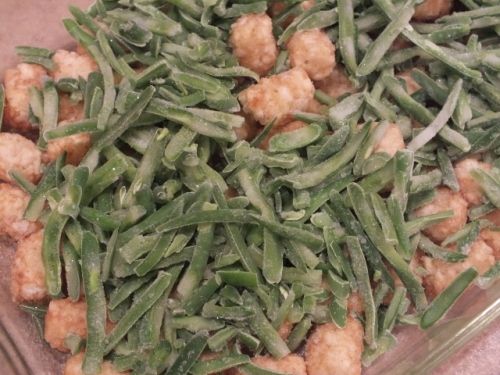
Preheat oven to 375 degrees. Spray a 9x13 casserole dish with spray. Spread a layer of Ore-Ida Extra Crispy gluten free tater tots to cover the bottom of the dish. Next, spread a layer of frozen green beans or chopped broccoli over the tots.

Preheat oven to 375 degrees.
Spray a 9×13 casserole dish with spray. Spread a layer of Ore-Ida Extra Crispy gluten free tater tots to cover the bottom of the dish. Next, spread a layer of frozen green beans or chopped broccoli over the tots.

“Napoleon, give me some of your tots!”

“No! Go get your own!”

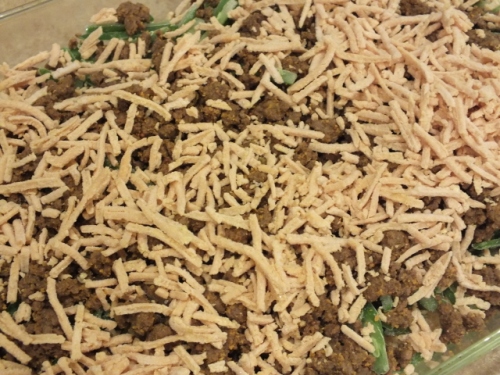
Next, layer one pound of seasoned ground beef over the other ingredients. I had leftover taco meat - bonus!

Next, layer one pound of seasoned cooked ground beef over the other ingredients. I had leftover taco meat – bonus!

Next, layer about 1/2 cup (or more if you like) Daiya cheese. Make sure to sprinkle it evenly.

Next, layer about 3/4 cup (or more if you like) Daiya cheese. Make sure to sprinkle it evenly.

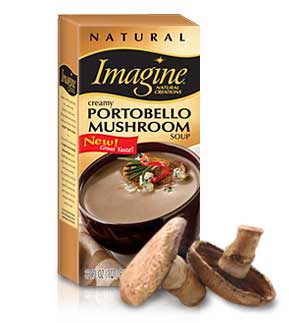
Here's where it gets really unattractive. But yummy all at the same time. Pour half a carton (32 oz) of Imagine Creamy Portobello soup into a bowl. Add two Tablespoons corn or tapioca starch and whisk until smooth. Pour mixture over casserole, then pour the remaining soup over that.

Here’s where it gets really unattractive. But yummy all at the same time. Pour half a carton (32 oz) of Imagine Creamy Portobello soup into a bowl. Add two Tablespoons corn or tapioca starch and whisk until smooth. Pour mixture over casserole, then pour the remaining soup over that.  Spray foil with cooking spray so it won’t stick to the Daiya and cover casserole tightly. Bake for 35 minutes at 375, removing the foil at the 30 minute mark.

I must clarify once again that if you are allergic to soy, the online ingredients of the soup may disappoint you as it says the soup contains soy milk. However, the boxes I have purchased do not contain any soy at all, so go figure.

Then pull it out of the oven to the remarks of your children saying, "We're eating THAT?" (One of my kids actually called it 'The Poo Poo Platter', made famous in the movie 'Bug's Life'.)

Then pull it out of the oven to the remarks of your children saying, “We’re eating THAT?” (One of my kids actually called it ‘The Poo Poo Platter’, made famous in the movie ‘Bug’s Life’.)

Trust me here. It looks like a science project, but it is really, really tasty.

And once your family gets over the shock of its appearance, they’ll ask you if you can make it again.

And again.

It’s that yummy!

Tater Tot Casserole: Allergy Free Style

  • Preheat oven to 375 degrees.
  • Spray a 9×13 casserole dish with spray.
  • Spread a layer of Ore-Ida Extra Crispy gluten free tater tots to cover the bottom of the dish. Next, spread a layer of frozen green beans or chopped broccoli over the tots.
  • Next, layer one pound of seasoned cooked ground beef over the other ingredients. 
  • Now layer about 3/4 cup (or more if you like) Daiya cheese. Make sure to sprinkle it evenly.
  • Pour half a carton (32 oz) of Imagine Creamy Portobello soup into a bowl. Add two Tablespoons corn or tapioca starch and whisk until smooth. Pour mixture over casserole, then pour the remaining soup from the carton over that. You will be using the entire carton.
  • Spray foil with cooking spray so it won’t stick to the Daiya and cover casserole tightly.
  • Bake for 35 minutes at 375, removing the foil at the 30 minute mark.
  • Remove at 35 minutes, or when casserole is bubbly and hot.


Happy Eating the Classics Without the Worries!

Peanut Butter Cookies: Three Different Delicious Ways to Make Them!

Leave a comment

pb resize

Who here does not LOVE peanut butter cookies?

You DON’T? And you’re not allergic to peanuts?!?

I cannot even comprehend.

For the rest of us with normal taste buds, today’s post is a festival of peanut butter cookie goodness.

I could eat them every day.

But I don’t. Because I don’t want to be a Fatty Two By Four.

Shall we begin?

Vegan Three Ingredient Peanut Butter Cookies

  • 1/4 cup plain, unsweetened applesauce
  • 3/4 cup sugar (your choice here: coconut, date, turbinado, or the white cancerous kind…)
  • 1 cup peanut butter (I use Adam’s. Please, don’t use peanut butter flavored shortening here….otherwise known as Skippy or Jif. Yuck.)

Preheat oven to 350 degrees.

Combine all three ingredients with a mixer.

Once ingredients are combined, shape dough into small balls and place on an ungreased (or better yet, parchment paper lined) cookie sheet or stone. Criss cross each cookie ball with a fork.

Bake for ten minutes (or until golden, so they may need to bake a little longer depending on your oven).

Remove from oven and let sheet sit on a cooling rack for ten minutes before transferring cookies to another cooling rack.

Now for recipe number two! Identical to the first recipe except for one ingredient. Yes, you’ll notice I did copy and paste from the last recipe. I have things to do! Like eat peanut butter cookies.

Three Ingredient Gluten/Dairy Free Peanut Butter Cookies

  • 1 chicken or duck egg
  • 3/4 cup sugar (your choice here: coconut, date, turbinado, or the white cancerous kind…)
  • 1 cup peanut butter (I use Adam’s. Please, don’t use peanut butter flavored shortening here….otherwise known as Skippy or Jif. Yuck.)

Preheat oven to 350 degrees.

Combine all three ingredients with a mixer.

Once ingredients are combined, shape dough into small balls and place on an ungreased (or better yet, parchment paper lined) cookie sheet or stone. Criss cross each cookie ball with a fork.

Bake for ten minutes (or until golden, so they may need to bake a little longer depending on your oven).

Remove from oven and let sheet sit on a cooling rack for ten minutes before transferring cookies to another cooling rack.

And now for the more traditional peanut butter cookie, only without the allergens or Crisco like the ones Mom used to make. (You know what I’m talking about if you’re a child of the eighties or older. You probably also drank Tab. And ate copious amounts of Doritos. Which is why you are here because now you have food allergies or sensitivities.)

Allergy Free Peanut Butter Cookies

  • 1/2 cup Earth Balance spread
  • 3/4 cup natural peanut butter (Such as Adam’s)
  • 1 cup firmly packed light brown sugar (coconut sugar works well here too)
  • 1 Tb gluten free vanilla
  • 1 chicken/duck egg OR 1 Tb ground flaxseed and 3 Tb water
  • 1 3/4 cups gluten free flour
  • 1/2 tsp salt 
  • 3/4 tsp baking soda
  • (Optional) 1/2 cup Enjoy Life mini chocolate chips

Preheat oven to 375 degrees. 

In a medium mixing bowl, combine Earth Balance, peanut butter, sugar, vanilla and egg or replacer. Beat until thoroughly creamed together. 

Next add the dry ingredients: Gluten free flour, salt and soda. Blend until completely combined, being sure to mix in any dry ingredients from the bottom of the bowl.

If desired, add the chocolate chips.

Roll dough into 1 inch balls and place 2 inches apart on an ungreased or parchment lined cookie sheet. Criss cross each ball with a fork. 

Bake cookies for 10 minutes or until edges are golden and cookies are set.

Remove from oven and let sheet cool on a wire rack for at least ten minutes before transferring cookies to another cooling rack.

While cookies are cooling, make a nice pot of coffee or heat up a mug of chocolate almond milk to wash them down with.


Happy Being Nutty!

Older Entries